Author Archives: madameshepard

Using a Rubric to Assess Presentational Writing Tasks

As my long-time followers will have noticed, my understandings related to assessment have continued to evolve over the past several years.  Between this blog and my TPT store, I have shared dozens of different rubrics, each of which reflected my knowledge and beliefs at that time.  In my latest presentational writing rubric, I’ve tried to address certain challenges inherent in using rubrics in the world language classroom. Here are a few that come to mind:

  1. Rubrics must be written in student-friendly language so that they can be used to provide feedback to students.
  2. Rubrics must be concise so that teachers can assess student work efficiently.
  3. Rubrics must ensure that we are addressing our national standards by incorporating the ACTFL Proficiency Guidelines and ACTFL Performance Descriptors.
  4. For most teachers, rubrics must lend themselves to producing a numerical or letter grade.

An additional obstacle in developing rubrics for world language students is that in measuring progress toward proficiency, it is not enough to use a well-worded rubric.  We must also assign performance tasks that are appropriate to the targeted proficiency level of our students. (Click here for information about proficiency level expectations.) I find that the simplest way to do so is by customizing relevant NCSSFL-ACTFL Can-Do Statements when creating assessments. 

Example: I can present personal information about my life and activities in a message to a keypal , using simple sentences most of the time. 

In this example, the italicized text is taken directly from one of the Novice High Presentational Can-Do Statements and the bold print text describes the performance task.  The teacher might, of course, specify additional details or length requirements.

Having created an appropriate task, we can use the rubric to select the proficiency level that most closely aligns with each student’s performance.  In this new rubric, I have clarified the two major considerations that must be taken into account when placing students’ writing along the proficiency continuum. The first is to define the extent to which the student’s writing is comprehensible.  Therefore, first  bold print sentence in each column specifies who can understand the student’s text and how well. 

It is important to note that while comprehensibility is important, it is not enough to determine a student’s level of performance. In fact, our Novice Low-Mid students might be the most comprehensible of all! Because they rely exclusively on memoried words and phrases, these students can often produce error-free lists or other appropriate novice tasks.  Therein lies the importance of the second bold print sentence, which specifies the text type, amount of detail and organizational  features of the student’s performance.  When using this rubric, the student’s level is determined by the highest level for which the student meets all of the criteria.

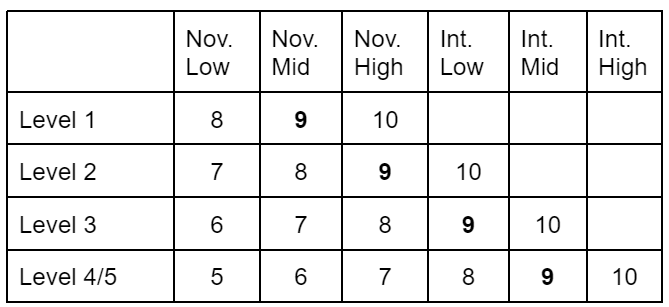
Most of us will have one more challenge, which is to assign a letter or percentage grade to the performance. Doing so may depend on your school culture, personal philosophy and other factors.  Personally, I feel most comfortable assigning a 9/10 (or 90%) to students who meet the targeted proficiency level.  For standards-based grading, I would use this level as the Level 3 or “Meets the standard.”  The next highest level would be assigned a 10/10 or Level 4 “Exceeds the standard.”  I would assign a score of 8/10 for the proficiency level that is one below the target, a 7/10 to the level that is two below the target, and so on. Here’s a table that reflects this scoring method.
I’d love to hear how you’ve addressed the challenges in using rubrics to assess written tasks. Please share by clicking on “Leave a reply” at the top of this post!

5 Tips for Encouraging Students to Speak in Class

One of the most frequent frustrations that I hear from the teachers I work with is that their students are not willing to speak the target language in class.  While there are many reasons that students hesitate to speak, I have found the following practices considerably improved my students’ willingness to participate in the frequent formative interpersonal speaking assessments that are included in my curriculum.

  1. Provide frequent opportunities for low stakes speaking tasks. As those that use my materials know, I include frequent interpersonal speaking activities in my units. As a result, the majority of my students quickly became comfortable speaking with a partner.  
  2. Make it clear to students that the purpose of the oral interpersonal tasks is to speak.  Most of the tasks include a written component upon which the conversation is based.  However, I make it clear to students that I don’t ever grade the written aspect of the activity.  This clarification removes the student’s temptation to avoid speaking by covertly showing their papers to their partners, speaking English, etc.
  3. End the activity as soon as the first 2-3 pairs have finished (or provide enrichment for early finishers). Since the goal of these tasks is to provide feedback on interpersonal communication, it is not necessary for every student to complete the entire task. Setting a time limit both encourages the students to remain on task and avoids having several students without a meaningful task to complete while their classmates finish their work.
  4. Circulate among the students as they complete the task. In addition to encouraging the students to stay on-task, this practice allows the teacher to provide individualized oral feedback to students. This coaching guides students to make progress toward proficiency as well as normalizes the teacher as an observer during interpersonal tasks.
  5. Provide written feedback. Depending on their own philosophy and school culture, teachers may or may not regularly provide grades on formative tasks.  Because I had a category in my gradebook for formative tasks, I felt it was important to record occasional scores for these interpersonal tasks. However, I found that I could not possibly grade every student during a 15-minute task.  Instead, I simply chose 5-7 students to formally assess during each activity.  By the end of a week, I had a grade and written feedback for every student.  Click here for a generic interpersonal rubric can be used with students of various proficiency levels to quickly provide feedback and/or a formative grade.  

If you’d like to provide additional opportunities for your students to engage in interpersonal speaking tasks, you might consider incorporating one of these spring-themed mini-units:

  • Click here for a 6-day mini-unit on secular Easter traditions for French 1 students.
  • Click here for a 90-minute lesson on Saint Patrick’s Day for French 1 or 2 students.
  • Click here for a 4-day mini-unit on Saint Patrick’s Day for French 2 or 3 students.
  • Click here for a 90 minute lesson on Ramaddan and Aïd-al-fitre for French 2 students.
  • Click here for a 7-day mini-unit on rainy day activities for French 1 or 2 students.

Please share your own tips for encouraging students to speak the target language in class by clicking on Leave a reply at the top of this page!

Suggestions for days when you just can’t

It will come as no surprise to my regular readers that I love lesson planning. I love the excitement of finding that perfect authentic resource that is comprehensible, engaging and presents the cultural content that I want to share with my students. Once I have found the ideal text, I take pleasure in creating the learning activities that will guide my students in interpreting that text, provide a context for relevant interpersonal communication, and prompt them to express their ideas in the presentational mode.

As stimulating as creating these tasks might be, they do take considerable time and intellectual energy. As teachers, these two things are often at a premium and there are days when we just can’t. We don’t have enough hours in the day and our energy is depleted after the myriad demands of our work and personal lives.  For these times, it’s nice to have some go-to lesson ideas that don’t require anything more than the resource we have selected as the basis for our lesson. Click here for the templates I have created and keep reading for some suggestions that will help you create your own.

3 Steps for creating a lesson plan for any resource

  1. Select an interpretive task.  Before our students can use the vocabulary, structures and content in a text, they must, of course, read or listen to it (and probably more than once).  As I explained in this recent post (and this follow up post), I think graphic organizers are the way to go when we don’t have the time and energy we need to create questions that are specific to the selected text. 
  2. Describe the type of interpersonal communication the students will have based on the content of the authentic resource. While I love the Novice speaking activities I shared in this post, creating these tasks requires a significant time commitment on the teacher’s part. When our schedules don’t allow for this, I like to put the students in charge of scaffolding the conversation.  For Novice students, this might mean that they write questions (using sentence starters) and then interview a partner. Asking them to compare their responses in a Venn diagram can provide additional opportunities for producing language to this task. Intermediate students might also be assigned a discussion based on their responses in the graphic organizer, but in a more spontaneous, open-ended context.
  3. Design a presentational task based on the contents of the authentic resource and results of the interpersonal task. Novice students might make a list or write short sentences based on a context related to the text. Intermediate students might write a blog post or journal entry from their own perspective or one suggested by the content of the authentic resource.

I’d love to hear your go-to lesson ideas for days that you “just can’t.”  Please share by clicking on “Leave a reply” at the top of this page. To join my newsletter and receive a set of free plug and play lesson plan templates, click on the link below.

My Top 5 Speaking Activities for Novice Learners

When I polled the members of my Facebook group about the types of activities they’d like me to include in the Novice housing unit I am working on, nearly all of the responders mentioned their favorite speaking tasks.  

Here are their favorites and a couple others that have worked well for me.

  1. Partner Matching Game

How it’s prepared: The teacher prepares the Student A document by making either a 4 x 8 or 5 x 10 cell grid.  They type the numbers 1-16 or 1-25 in numerical order in the even numbered rows. Above each numbered cell, the teacher inserts a clipart image related to the content of the lesson. The teacher prepares the Student B document by making a digital copy of the A document, changing the numbers to letters, and mixing up the order of the images. Note: Depending on the students’ proficiency level, the teacher might include pictures that are quite similar so that the students have to be very detailed in their descriptions and clarifying questions. Click here for an example with fruit vocabulary from this unit

How it’s played: Student A and Student B are each given a digital or paper copy of their document. They take turns describing one of their pictures, asking clarifying questions, and then noting the number or letter of the partner’s picture that matches each of theirs.

When to use it: This one works especially great for reviewing concrete vocabulary. It can also be used to review a narrative text if screenshots or similar visuals are used.  

  1. Same/Different Game

How it’s prepared: The teacher prepares the Student A document by creating a grid as in the Partner Matching game and then making a digital copy for Student B. The teacher then modifies the Student B paper by substituting a similar image for several of the original images on the paper. Click here for an example with vocabulary from a cartoon found in this unit

How it’s played: The students are placed in A/B pairs. They then discuss each picture in order to determine whether they have the same picture or a different one.

When to use it: To review key vocabulary. 

  1. Guess Who Game

How it’s prepared: The teacher chooses 12 images that represent a targeted structure or key vocabulary term and includes a table with the images and captions (containing the targeted structure) at the top of the student document. The teacher then lists 12 different names on the same document.The teacher pastes 8 of the 12 images in a row below each name. Click here for an example with morning routine vocabulary from this unit. Click here for a template that can be used to create your own game.

How it’s played: The students are assigned a partner and each secretly choose one of the identities (names). They then take turns asking questions in order to determine their partner’s identity.

When to use it: To practice key vocabulary related to the unit of study or targeted structures

  1. Pair Crossword Puzzle

How it’s prepared: The teacher uses an online platform, such as puzzlemaker.com, to create a crossword puzzle.  The words (to be placed in the puzzle) should be very concrete for Novice learners. When creating the puzzle, the clue for each word should be the same as the word. The teacher prints 2 copies of the blank puzzle and fills in the horizontal answers on the Partner A paper, and the vertical answers on the Partner B paper. (The teacher will need the clues to know where to write each word.) The teacher then copies an A or B paper for each student. Note: The student papers should not include the clues, just half of the answers placed in the puzzle. Click here for an example using family vocabulary from this unit.

How it’s played: The students use circumlocution to give clues to their partner, enabling them to complete their puzzle. 

When to use it: To review vocabulary, stories, or cultural content

  1. Yes, because… 

How it’s prepared: The teacher creates a numbered list of yes/no questions based on a text or general cultural content in the Partner A document. The teacher types an answer which includes an elaboration for each of the questions in the Partner B document. The teacher then prepares a part B of the activity in which Partner B has the questions and Partner A has the responses.Click here for an example from this unit about Mardi Gras and Carnaval.

How it’s played:  Student A reads their first question and Partner B reads the response that seems like the best fit. The students then share the number/letter of the question/answer that corresponds to each item on their paper. The players will switch roles in part B.

When to use it: To review the details in an informational or narrative text

I’d love to learn from you! Please share a favorite Novice speaking tasks by clicking on the “Leave a reply” link at the top of this page.

What about the Grammar ? (Novice Edition)

One of the most common questions I am asked about the French 1 curriculum I’ve created has to do with grammar exercises.  Those of us that have taught or currently teach using a textbook as the basis for our curriculum expect to drill and assess a few grammar points in each chapter. As users of my curriculum have noticed, there are far fewer grammar exercises in my resources. In general, form-focused activities in my French 1 units are only included when there is a communicative context that requires the use of a specific structure and I do not formally assess the knowledge of the grammatical rule in isolation.

There are a few reasons I have designed my units for Novices in this way. As the table on this page shows, the targeted proficiency level at the end of one year of study for level 1 languages is Novice Mid and at the end of the second year it is Novice High. Let’s look at the Novice proficiency benchmarks from the NCSSFL-ACTFL Can-Do Statements. (The italics are mine.):

Interpretive:I can identify the general topic and some basic information in both very familiar and everyday contexts by recognizing practiced or memorized words, phrases, and simple sentences in texts that are spoken, written, or signed.

Interpersonal:I can communicate in spontaneous spoken, written, or signed conversations on both very familiar and everyday topics, using a variety of practiced or memorized words, phrases, simple sentences, and questions.

Presentational: I can present information on both very familiar and everyday topics using a variety of practiced or memorized words, phrases, and simple sentences through spoken, written, or signed language.

The emphasis on “practiced or memorized” at this level makes it clear that beginning students do not need to be able to conjugate verbs, determine correct adjective agreement, or memorize word order rules. 

What they do need, however, is lots of input and opportunities to express meaning by practicing words and phrases in communicative contexts.

What’s the harm?

Why not get a jump on teaching these structures. After all, this is the way so many of us learned the language we teach. Well, here are a few reasons:

  1. Explicit grammar instruction may not be very effective. As stated in this ACTFL resource, “Grammar is an important element of communication, but research shows that explicit teaching of grammar has little effect on people’s language acquisition, comprehension, or writing abilities.”
  2. My own experience highlights an equally important drawback to an emphasis on focus on form exercises. I found that students who are not successful on assessments of grammatical rules often lost confidence in their ability to learn the language and as a result tended to discontinue their language studies. These same students often excelled at communicating orally and I wanted to keep them in class!
  3. Drills and exercises that focus on the memorization of grammatical rules take valuable time away from meaningful communicative tasks. The ability to interpret texts, communicate in spontaneous conversations and present information, all in  “familiar and everyday contexts” requires lots of comprehensible input, communicative practice and significant feedback.  

But they need to know the rules eventually!

Of course they do! If we can keep all of our students present and engaged in our classes, there is plenty of time for a more intentional focus on form as they progress on the proficiency path. In the meantime, here are a few ways to prepare our Novices without grammar drills.

  1. Answer their questions.  When a student notices a difference in verb endings, adjective spelling, or other form, this is a great time for a pop-up grammar lesson.  We can ask them leading questions to guide them in formulating a rule. For example, “Yes, there’s an “s” at the end of the verb in that sentence, but not at the end of the verb in the other sentence. Why do you think that is? What do you notice about the subject of the sentence?” (And then be prepared to have the same conversation many, many times, as the light bulb goes off for various students.)
  2. Ask questions. After the students have had considerable exposure to basic structures (common conjugations, adjective placement, types of articles, etc.), you might point out these structures in the authentic texts that you are working with. “Look at that. How is the French word order different from the English word order in that sentence?” 
  3. Provide environmental support. Classroom posters with verb conjugations and other structures can scaffold students in producing accurate language before the structure has been fully acquired. 
  4. Design opportunities for the students to use certain structures in communicative tasks. After the students have seen a structure in context multiple times, I might incorporate a lesson which focuses on the form. Typically these lessons are based on an authentic resource, such as a cartoon, and the students are guided in formulating the rule by interpreting sentences which contain the structure. They then practice the structure in an interpersonal task with the support of sentence starters, as needed.  Finally, a highly scaffolded presentational task provides a context for producing the structure.
  5. Focus on feedback. By circulating amongst the students as they complete these communicative tasks, the teacher is able to provide individualized feedback on the pronunciation and spelling of the targeted form in a non-threatening way. If appropriate for their teaching environment, the teacher might even administer a quick formative assessment on the structure to provide further feedback to the students.

See these resources for examples of the type of lessons that are described above.

For regular -re verbs: https://www.teacherspayteachers.com/Product/Focus-on-Regular-re-Verbs-A-3-day-Mini-unit-for-French-1-or-2-Students-10922640 

For regular -ir verbs: https://www.teacherspayteachers.com/Product/Focus-on-regular-verbs-that-end-in-ir-10903732 

For common irregular verbs: https://www.teacherspayteachers.com/Product/Verb-Review-Bundle-for-French-I-2-Lessons-on-Avoir-Etre-Faire-and-Aller-9762970 

Tips for selecting appropriate graphic organizers

I was so happy to receive such kind comments about my recent blog posts. I’ve really missed being part of this community!

I was especially grateful for the colleague who asked about selecting graphic organizers based on the text and the proficiency level of the students.  It was such a great question, but I didn’t have a quick answer. There are so many things to consider when selecting the best format for each type of text and proficiency level! After thinking about it for a few days, I’ve decided to address each of my favorite graphic organizers individually, rather than making broad generalizations.

It is important to take into account that the suitability of any of the graphic organizers depends not only on the task, but also the comprehensibility of the text. Some teachers might even choose to allow Novice students to complete some or all parts of the graphic organizer in English, as is often done with other types of interpretive tasks.

Note: The first four graphic organizers are included in the free download at the bottom of my previous post.

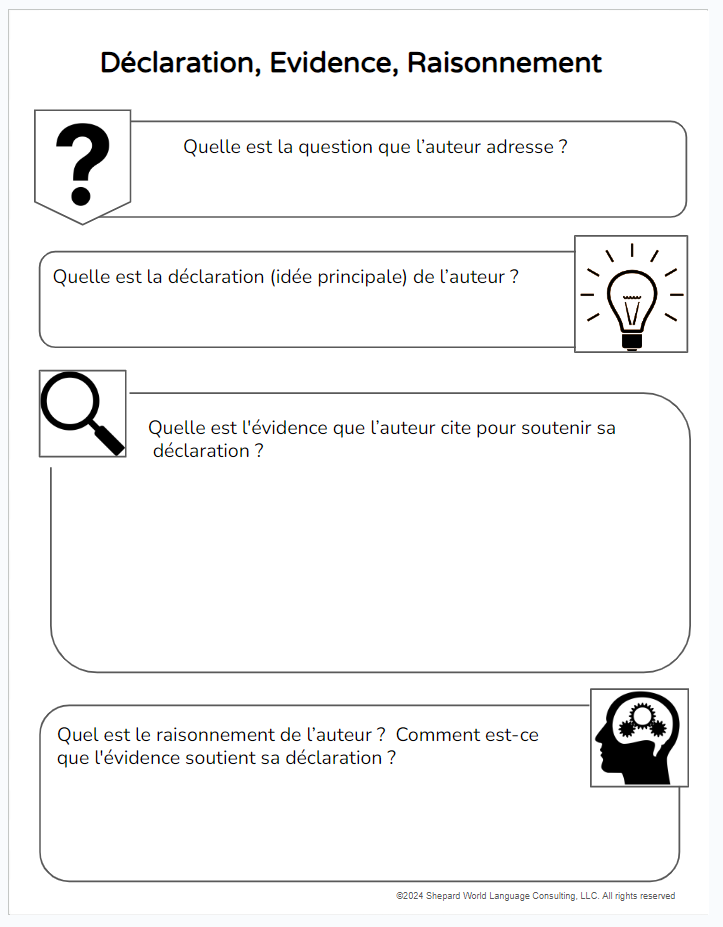
  1. Claim, Evidence, Reasoning. Although this strategy was created to help students develop their own claim, I created a graphic organizer that guides learners  in using the same steps (Identify a question, the author’s claim, the textual evidence, and an explanation of the author’s reasoning) to interpret an informational text. I love the critical thinking that this one entails and the required re-reading of the text is great for increasing students’ interpretive skills!
  • This one can be used with any informational text in which the author’s perspective can be inferred. This includes infographics, articles, informational videos, etc.
  • Although I have used CER with Novice students, I do scaffold the task by 1) providing a question, 2) including a list of possible claims from which they can choose and 3) allowing them to use English to explain the author’s reasoning. 
  1. Window Notes. In this note-taking activity, the students fill in each pane of a window with 1) facts, 2) feelings, 3) questions, and 4) connections/ideas as they are reading or listening to a text. This one is great for encouraging students to make personal connections to the text!
  • I use this one with any text (fiction or nonfiction)  that is engaging enough that students might have feelings about the information and are likely to be able  to make connections to their own experiences. 
  • Due to the language structures required to describe feelings and make connections, I would provide sentence starters to support students in lower levels in completing these sections.

Examples:

I am happy/sad/surprised/mad/etc. because…

I am like ____ because…

I am different from ____ because…

I agree with ____ because…

  1. Connect, Extend, Challenge. As the name suggests, the students will complete this diagram with 1) an explanation of how the information in the text connects to what they already know, 2) how it extends their thinking in new directions, and 3) what challenges or puzzles emerged as they were interpreting the text.  I think these questions are such a great way to encourage deep thinking and are likely to prompt an engaging discussion on the topic of the text.
  • I find this graphic organizer is well-suited to texts that include ideas that might be controversial or challenging, as it encourages students to examine their own perspectives and consider those of others.
  • Due to the nature of the prompts, I think this one is most appropriate for Intermediate and Advanced students. 
  1. Same, Different, Connect, Engage. Learners complete this graphic organizer by identifying how they are the same and how they are different from the subject of a non-fiction text or a character in a fictional text. They then explain how they are connected as people and describe what they would say to the person, ask them, or do in order to engage with them. 
  • This graphic organizer is appropriate for fictional texts, as well as informational texts that focus on a person. 
  • With some support, I think Novice Mid-High students could use this diagram with highly visual fictional texts (simple cartoons, illustrated stories written in simple sentences, etc.)

Sample sentence starters (These would, of course, be translated into the language you teach.)

___ and I …(have/are/like/play/go/live/etc.)…

___ (has/is/likes/plays/goes/lives/etc.) but I don’t.…

We are connected because we both…

I would ask ___  if/why/when/where/who….

I would tell ___ that…

I would like to play/watch/go to/etc. … with ___.

While not available on the free download, English and French versions of the following graphic organizers are included in this resource from TPT.  Note: The first four graphic organizers in this resource are also included in the free download for subscribers to my email list. 

  1. Claim, Evidence, Question. Like the Claim, Evidence, Reasoning diagram (see above), this one requires the students to identify the author’s claim and the evidence they use to support it.  However, rather than requiring learners to explain the author’s reasoning, it asks that they write a relevant question that was not addressed in the text.
  • This graphic organizer is applicable for a variety of informational texts in which the author expresses an opinion, perspective or point of view.
  • As with Claim, Evidence, Reasoning, I would provide students with a list of claims from which to choose. In addition, I would provide them with some sentence starters for information questions.
  1. Mirrors and Windows. In this strategy the students identify whether the ideas and examples in the text reflect their own experiences or provide a window into others’ experiences. I especially love using this one with texts that are rich in cultural details.
  • This one is suitable for both fiction and non-fiction texts, especially those that are rich in cultural content.
  • I have found that Novice Mid-High students can complete this graphic organizer successfully by recycling phrases  from the text. 
  1. The 4 C’s. Learners fill in this diagram with Connections between the text and their own experiences, Challenges that they had with the ideas, positions or assumptions in the text, important Concepts that they want to retain from the text, and Changes in attitudes, thoughts, and actions that are suggested by the text.
  • This task is appropriate for a variety of informational texts, especially those related to social justice issues.
  • Due to the nature of the prompts, I think this one is best for Intermediate and Advanced learners.
  1. Compass Point Diagram. Before assigning this graphic organizer, the teacher presents the students with some type of proposition related to the text (Ex. Let’s take a trip to Paris!) Based on the information provided in the assigned text(s), the students fill in 1) details that they need to know in order to determine their stance on the proposition, 2) details that excite them about the proposition, 3) details that worry them about the proposition and finally, 4) their stance on the proposition.  As you might have noticed, the bold print letters are the same as the starting letters of the compass points, hence the name of the diagram.  Imagine my challenge is translating this one into French!
  • This graphic organizer is pertinent whenever a proposition can be made during a unit of study. The students could continue adding to the diagram as they read/listen to various informational texts. It is recommended that the students fill in their stance (or opinion) toward the end of the unit. 
  • With the support of relevant sentence starters, this one can be used with Novice Mid-High students.

Sentence starters

I need to know why/when/who/where/what/if…

I like/love/want to/…

I don’t like/am afraid of/hate/don’t want/don’t know…

I would like to …because…

  1. Character Traits. This diagram, as well as the next, are primarily used with fictional texts.  In the example I have provided, the students identify 3 traits of a character and then provide evidence of that trait in the story.  
  • This one is applicable to any fictional written or recorded text.
  • Novice Mid-High students do well with this one as long as the texts are comprehensible. I think it’s helpful to provide these learners with a list of possible character traits, many of which will likely be cognates.
  1. Story Map. The students fill in this graphic organizer with the setting, characters, conflict/problem, important events and resolution.  
  • This one is applicable to any fictional written or recorded text.
  • Novice Mid-High students can be successful with this one by recycling phrases from the text.

Note: Many of these graphic organizers are based on thinking routines from https://pz.harvard.edu/thinking-routines orvhttps://learn.k20center.ou.edu/ . I highly recommend these sources for critical thinking activities!

Top 5 Reasons to Assign a Graphic Organizer

Can anybody guess what my New Year’s Resolution is this year? That’s right, I’m finally able to prioritize my blog.  It has been a busy few years developing my curriculum on Chez Shepard and now that I’ve completed curricula for levels 1-3, I’m really excited about having more time to work with my virtual colleagues/blog subscribers. I am optimistic that we will now be able to interact more easily in this space. Imagine my dismay when I recently discovered that I had inadvertently disabled comments several months ago! Please accept my apologies if you made a comment that didn’t make it to the page! I think we’re good to go now.

For this first post of 2024, I wanted to chat a bit about graphic organizers, one of my favorite resources to use for interpretive tasks. Here are the reasons why:

  1. Graphic organizers are low prep. If you find a great authentic resource at the last minute, there’s no need to create a worksheet to go with it, just grab your favorite graphic organizer and make copies.
  2. Graphic organizers encourage critical thinking. My research on critical thinking skills has introduced me to so many different graphic organizers.  I love being able to vary the ones I use so that the students stay engaged as they delve more deeply into the content of a unit.
  3. Graphic organizers can be used with students of all levels of proficiency.  Teachers can scaffold many graphic organizers for Novice students by allowing them to write their responses in English (after reading/listening to the text in French), providing appropriate sentence starters, or encouraging the use of words and phrases rather than complete sentences.
  4. Graphic organizers are individualized. No two students will ever complete a graphic organizer with the exact same wording, so students will (hopefully!) be discouraged from attempting to copy each other’s responses. 
  5. Graphic organizers facilitate interpersonal communication. When we encourage the students to share and discuss the information they have included in a graphic organizer, we provide an authentic context  for interpersonal communication.

But what about the grading?

When I first started using graphic organizers, I incorporated them rather sparingly due to the enormous effort I was putting into grading them.  I would create an answer key with what I felt was the ideal response, assign a number of points based on how close the student’s response was to mine, and so on. Please don’t be the old me!  The new me would streamline the process by choosing one of the following ways of providing feedback.

  1. Use a rubric. I have developed so many different rubrics and will undoubtedly keep creating new ones.  For graphic organizers, I’d aim for something pretty simple, such as this one.
  2. Assess students comprehension with an oral or written quiz. It takes no time at all to write 5-10 true/false questions about the text that was interpreted in the graphic organizer. (In fact, it can be done while circulating as the students are working!) The teacher can then read the statements aloud or project them as a quick way to check the students’ comprehension of the text. 
  3. Provide oral feedback during a class or small group discussion of the students’ responses. As I mentioned earlier, I love having the students discuss their graphic organizers after they have completed them.  Not only do these conversations provide important practice in interpersonal speaking, they also allow the students to learn from their classmates’ divergent perspectives. As the teacher circulates during these conversations, they can provide feedback by questioning and commenting on the students’ ideas. For Novice students who aren’t yet ready to discuss their ideas in small groups, the teacher might guide a very simplified class discussion by asking students to share their responses and asking simple questions or providing brief comments.

If you have a favorite graphic organizer or tip for other readers, please leave a reply.  If you’d like to join my mailing list and receive a free set of graphic organizers, sign up below.

Pre-Listening Activities for Novice Students: Examples for teaching school supplies

In my last post, I shared some examples of pre-listening activities for students at the Intermediate level.  It is, of course, equally (or even more!) important to support Novice students by guiding them in activating background knowledge, engaging relevant vocabulary and providing reasons for listening.

Here are a few pre-listening tasks that would be a great fit for Novice Mid students before viewing a video in which a member of the target culture presents their school supplies.

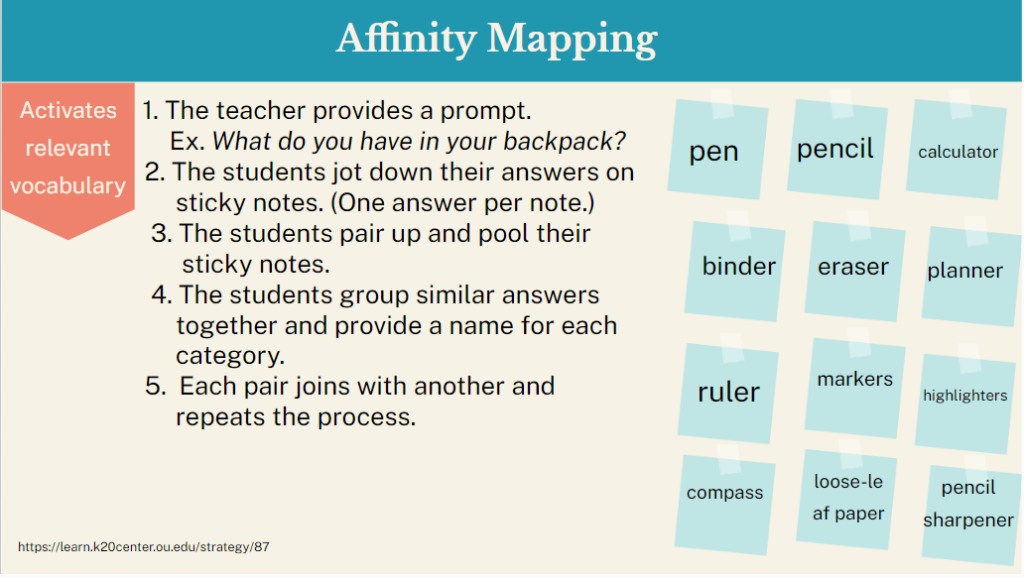
Affinity Mapping For this activity each student is given 3-5 sticky notes and asked to write one French word for something in their backpack on each note.  The students then pair up and pool their sticky notes. The students group similar answers together to form 2 categories and provide a name for each category. (Examples: Things that fit in a pencil case/Things that don’t fit in a pencil case, Things I write with/Things I don’t write with, etc.). The teacher can then lead a class discussion in the target language by asking each pair what categories they created and what items they included in each one. As an additional challenge, the teacher might have the students start over and create 3 categories the second time.  (Note: Because of the limited vocabulary at this level, I would assign each member of the pair  either the letters A – L or M – Z so that they didn’t write down the same items.)

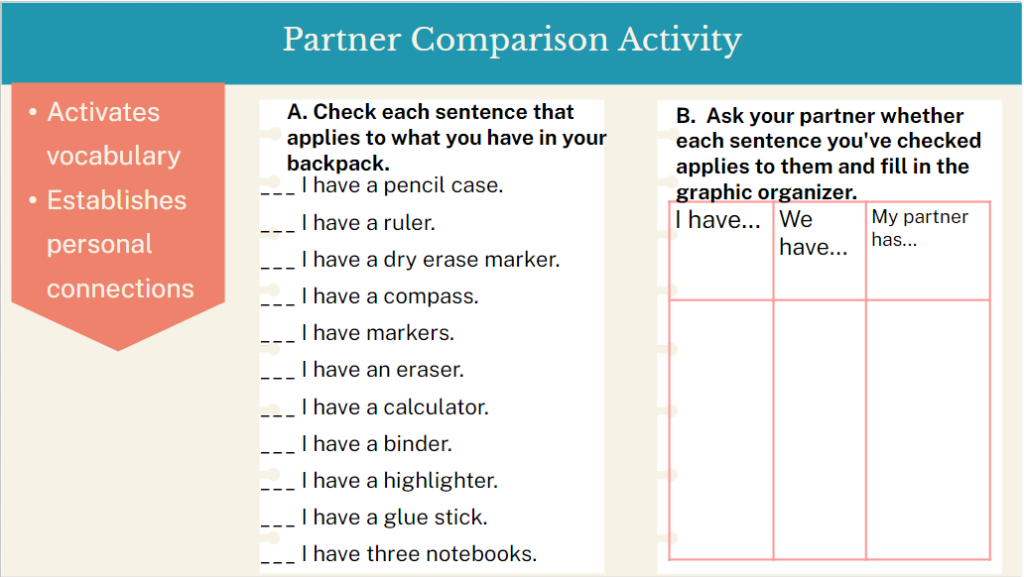
Partner Comparison Activity. In this activity, each student checks the sentence that applies to them. (These sentences and follow up conversation would, of course, be in the target language.) Ex. If the student has a pencil case in their backpack, they check “I have a pencil case.” The student then asks a partner whether each sentence they have checked also applies to them. Ex. “Do you have a pencil case?” If their partner answers affirmatively, both partners write, “We have a pencil case.” in the middle of the diagram. If the partner answers in the negative, the partner who asked the question writes “I have a pencil case.” and the other partner writes, my partner has a pencil case.  

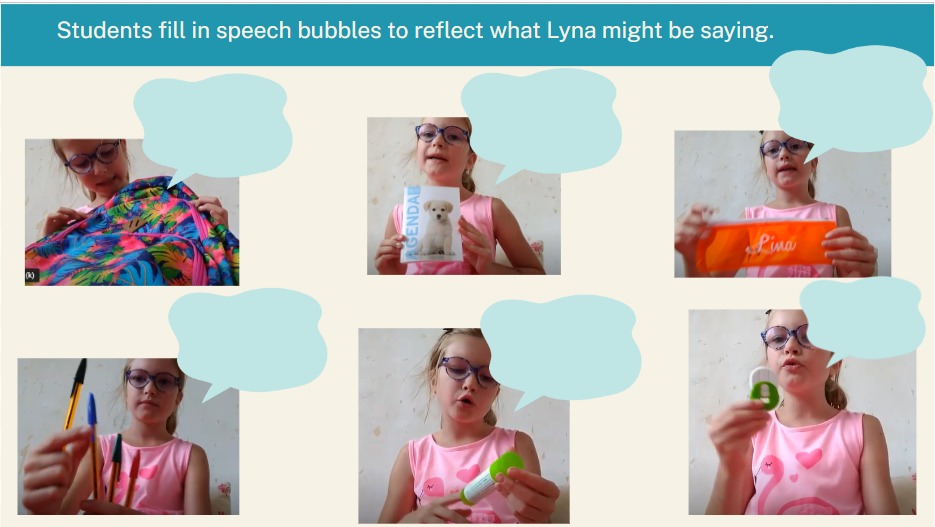
Making Predictions. Listening activities that require students to make predictions about the text they will listen to are especially effective, as they provide the students with a reason for listening. While there are many ways to facilitate predictions, in this case I might provide screenshots from the video and have the students fill in speech bubbles to indicate what the speaker might be saying.

For a complete introductory unit for French 1 students that includes the activities above, click here.

Pre-Listening Tasks: Examples for Earth Day

One of the most rewarding aspects of being an ACTFL presenter is learning more about language learning as I research a new topic for each proposal. This past year I decided to focus on becoming more knowledgeable about the listening process, as I hadn’t seen many sessions on this topic in the past.  

Did I ever have a lot to learn!  Before I started exploring this topic, my approach to preparing a listening activity was to write questions, add them to Edpuzzle or print them out and then instruct my students to go listen and answer the questions.

There was so much more I could have done to support my students before turning them loose with those YouTube videos!  Most importantly, I could have created pre-listening activities to activate my students’ prior knowledge. Doing so would have facilitated my students’ use of top-down processes to derive meaning from the texts they would be listening to.  As Hawkins and Henshaw explain on p. 106 of Common ground second language acquisition theory goes to the classroom, in top-down processing,“we apply our background knowledge, perspectives, expectations, and experiences to anticipate, understand, and infer ideas.”  

When we know better, we do better! Although I don’t currently work with students, I am able to use what I’ve learned about the role of pre-listening tasks in the resources that I create for other teachers.  Here are some of my go-to pre-listening activities.

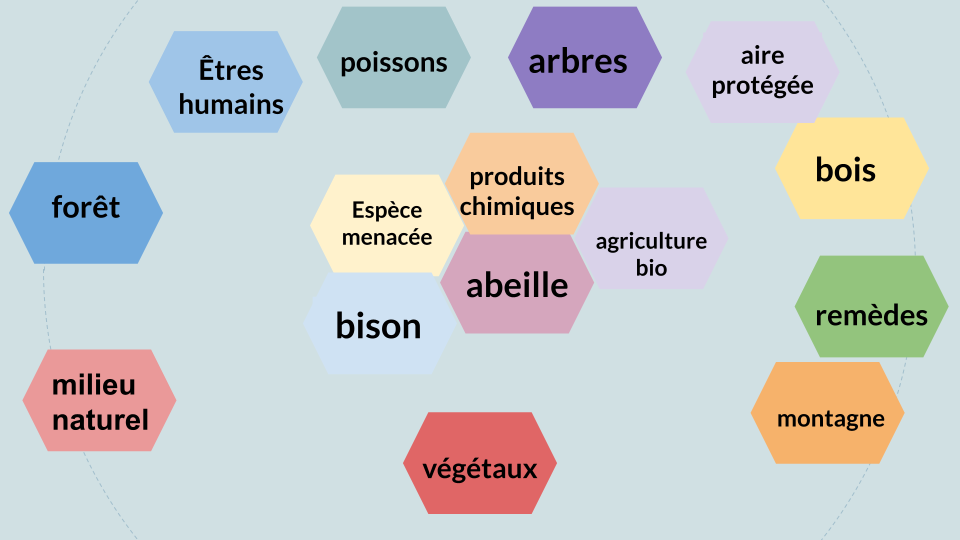
#1: Review key vocabulary. In addition to top-down processes, students engage bottom-up processing when listening as they identify known words to make meaning from what they hear. As a result, introducing or reviewing key words is an important pre-listening activity. One of my favorites is this Hexagonal Thinking Routine, in which students discuss relationships and manipulate words to create a web. Read more about this strategy here.

#2 Play the video without the sound.  By first playing the video without sound, the teacher can activate students’ background knowledge by asking relevant questions about the images.  This discussion also provides valuable language input to the students, introduces key vocabulary and develops their content knowledge.

Here’s a sample script for the video, C’est quoi la biodiversité.

(0:16) Qu’est-ce que tu vois ici ? Qu’est-ce que l’homme fait ? Qu’est-ce qu’il regarde ? Qu’est-ce qu’il entend ? Tu aimes faire des promenades dans la nature ? Pourquoi ou pourquoi pas?Où vas-tu pour profiter de la nature ?  Comment est cet endroit ? Qu’est-ce que tu y vois ? Qu’est-ce que tu y entends ? Qu’est-ce que tu y sens ?

(0:24) Quels milieux naturels sont représentés dans cette image ? Quels êtres vivants habitent dans les lacs? Et dans la forêt ? Et dans les montagnes ? Tu as fait de la rando dans les montagnes ? Lesquelles ? C’était comment ? Qu’est-ce que tu y as vu ? Qu’est-ce que tu y as entendu ? Qu’est-ce que tu y as senti ? Pourquoi est-ce que les gens aiment les montagnes ?…

(0:31) Qu’est-ce que ces flèches représentent ? Quelle est la relation entre l’homme et l’abeille? Et l’abeille et la fleur ? Le champignon et l’homme ? L’arbre et l’homme ? L’arbre et l’oiseau ?

(0:44) Qu’est-ce qu’il y a dans cette image ? Comment est l’arbre ? Pourquoi l’homme a-t-il besoin du bois ? Pourquoi le bois est-il important pour les êtres humains ?  Pourquoi est-ce qu’on détruit les forêts ? Quelles sont les conséquences d’un manque d’arbres pour la planète ?

(0:51) Qu’est-ce que tu vois dans cette image ? Qu’est-ce que l’abeille fait ? Qu’est-ce qui se passerait sans abeilles ? Les abeilles sont-elles menacées ? Pourquoi ?Qu’est-ce qu’on peut faire pour aider les abeilles ?

(1:03) Qu’est-ce que tu vois sur cette corde raide ? Pourquoi est-ce qu’on représente ces différentes espèces sur une corde raide ? (Qu’est-ce qui se passerait si une des espèces tombait de la corde ?)

(1:14)  Quelles activités humaines sont représentées dans cette image ? Quels sont les dangers de la déforestation ? Et la pêche intensive ? Et la pollution ? Comment est-ce que tu contribues à ces dangers ?

(1:29) Quelles solutions sont illustrées dans cette image ? Tu achètes des aliments bio ? Lesquels ? Tu plantes les arbres ? Tu donnes de l’argent pour créer des aires protégées ?

#3 Assign true/false questions.  Asking the students to answer true/false questions about the video before watching it encourages them to make predictions and provides a reason for listening.

Here are some sample questions for C’est quoi une espèce menacée ?

  1. Une espèce disparaît toutes les 13 minutes.
  2. Un mammifère sur dix pourrait s’éteindre dans un futur proche.
  3. La plupart des espèces disparaissent à cause de l’activité humaine. 
  4. Les gaz à effet de serre font fondre l’habitat de l’ours polaire.
  5. La pollution de l’eau menace la survie du requin.

I would love to hear from you about your favorite pre-listening activities!

For a complete unit on the environment for French 3 and 4 students, click here.