As I begin to adjust to this new normal, my thoughts have turned to how I might be modifying my teaching practices for an online environment if I were in the classroom. Since I like to start each lesson with an interpretive task, I began by envisioning some activities that I thought might be appropriate for distance learners. Two significant challenges to assigning interpretive texts in a distance learning environment occurred to me. First and foremost, teachers are spending more time working than ever before. Creating specific comprehension guides for each text is simply not possible. Secondly, without the physical presence of a teacher, many students find themselves resorting to copying classmates’ work or using Google to translate the texts they are given. While I’m not sure there’s a way to totally eliminate these behaviors, I have created a few tasks that I hope might discourage them. Each of these activities are open-ended, so that no two students would randomly end up with the same responses. Best of all, little or no modification should be needed. For the most part they are ready to be shared with students as is.
#1 KWL Template
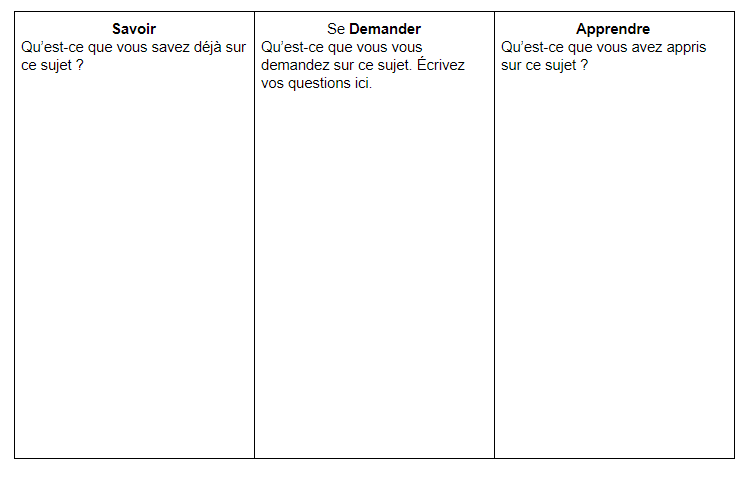
This oldy but goody can be used with any informative text. As a pre-reading activity, the students fill in what they know about the topic, as well as what they’d like to know. After reading a text or watching a video about the topic, the students fill in new information that they learned about the topic. Because I think this activity works best if the students are writing in French, I think it works best with Intermediate learners.
2. T-Chart

In this activity students fill in a graphic organizer with main ideas and supporting details. I find this one works well with both written and recorded informational texts and Novices might write in English while Intermediates might write in French.

For this graphic organizer, the teacher identifies a problem or event related to the content being studied, and students fill in the causes and consequences of this problem based on their interpretation of a written or recorded text. Based on the level of students, this might be completed in French or English.
Unlike the previous graphic organizer, this one is designed to work with narrative texts. As this example shows, students begin with the first event of the story and then add an effect of this action, which becomes the cause of the next one. I think this one works best in French, so I would have Novices write very short, simple sentences.

5. Annotation
The last low prep, open-ended task that I wanted to share was an annotation activity. While I often had students annotate texts in my classroom, I had them do so with a pencil and hard copy of the text. Since this won’t work with distance learning, I did some research and taught myself a new tech tool. (I actually practiced with several online annotation tools, but this one seemed pretty user-friendly so that’s the one that I chose to share here.)
Directions for students:
Go to https://www.pdfescape.com/windows/.
Click on Free Online on the left side of the screen.
(Note: If you are giving the students a pdf link from the internet, they will click Load pdf from Internet.
If you have uploaded a pdf to Google and are sharing the Google link, they will click on Upload pdf to PDFescape.)
These are the ideas I had about using this tool with remote learners. You’ll probably think of some others, too!
Once the pdf is
- Choose 10 words that helped you understand what you were reading.
- Click on the Annotate tab in the upper left corner.
- Click on Underline.
- Highlight the section you would like to underline. Make sure to change the color if necessary by clicking on Color at the top of the page.
(Note: Click on Underline again to stop Underlining texts. If you make a mistake, click the Undo arrow or highlight the annotation and click on the trash icon.)
- Choose at least 3 words that you don’t know but which would have helped you better understand the text.
- Click on the Annotate tab.
- Click on Rectangle.
- Highlight the word to create a rectangle around it.. Change the color if necessary
- Click inside the rectangle to bring up a text box.
- Look up the word at Wordreference.com and type the English meaning in the box.
- You can make the textbox smaller by clicking on the corners and you can move the text box by clicking on it and dragging it to a better location on your screen.
- Ask at least 2 questions about the information in the text.
- Click on the Annotate tab in the upper left corner.
- Click on More.
- Click on Oval.
- Highlight the section you have a question about.
- Change the color of your oval to either red or white, depending on the background color of your page.
- Click on the circle and type your question in the text box that appears.
- Write at least 3 new things you learned (about Francophone culture) from this text.
- Click on the Annotate tab in the upper left corner.
- Click on More.
- Click on Oval.
- Highlight the relevant part of the text. Change the color of the oval to blue or red.
- Click in the oval until you see a text box. Type a sentence explaining what you learned about Francophone culture from that section of the text.
- Make at least 3 connections between your life and the text.
- Click on the Annotate tab in the upper left corner.
- Click on Sticky Note.
- Highlight the relevant part of the text and when the Sticky Note box opens up, type a sentence explaining the connection between the text and your life.
If I were assigning this activity, I would have the students submit a screenshot of their annotated text. They can also select “Save and download pdf” but I found that when I sent myself a copy of the downloaded pdf, the information from the textboxes was not available. When I uploaded the pdf to my Google Drive, the sticky notes appeared as Comments, but the information from the textboxes in the ovals and rectangles did not appear. You could, of course, have the students use Sticky Notes for the types of information that I included in Circles and Rectangles.
Courage to all of you. You have my utmost admiration for the work that you are doing.