
As my long-time followers will have noticed, my understandings related to assessment have continued to evolve over the past several years. Between this blog and my TPT store, I have shared dozens of different rubrics, each of which reflected my knowledge and beliefs at that time. In my latest presentational writing rubric, I’ve tried to address certain challenges inherent in using rubrics in the world language classroom. Here are a few that come to mind:
- Rubrics must be written in student-friendly language so that they can be used to provide feedback to students.
- Rubrics must be concise so that teachers can assess student work efficiently.
- Rubrics must ensure that we are addressing our national standards by incorporating the ACTFL Proficiency Guidelines and ACTFL Performance Descriptors.
- For most teachers, rubrics must lend themselves to producing a numerical or letter grade.
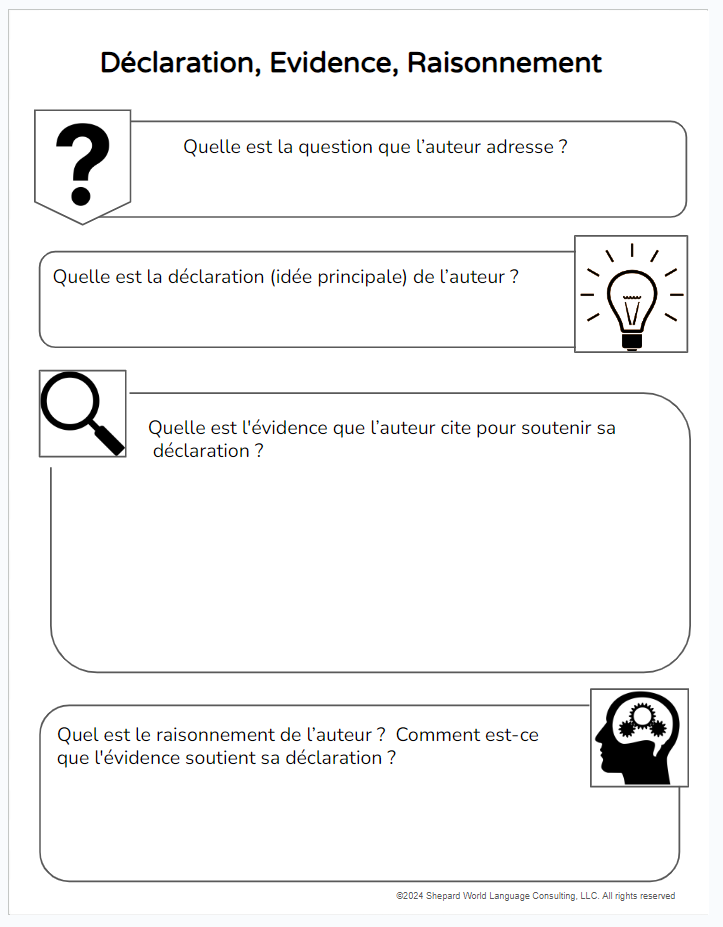
An additional obstacle in developing rubrics for world language students is that in measuring progress toward proficiency, it is not enough to use a well-worded rubric. We must also assign performance tasks that are appropriate to the targeted proficiency level of our students. (Click here for information about proficiency level expectations.) I find that the simplest way to do so is by customizing relevant NCSSFL-ACTFL Can-Do Statements when creating assessments.
Example: I can present personal information about my life and activities in a message to a keypal , using simple sentences most of the time.
In this example, the italicized text is taken directly from one of the Novice High Presentational Can-Do Statements and the bold print text describes the performance task. The teacher might, of course, specify additional details or length requirements.
Having created an appropriate task, we can use the rubric to select the proficiency level that most closely aligns with each student’s performance. In this new rubric, I have clarified the two major considerations that must be taken into account when placing students’ writing along the proficiency continuum. The first is to define the extent to which the student’s writing is comprehensible. Therefore, first bold print sentence in each column specifies who can understand the student’s text and how well.
It is important to note that while comprehensibility is important, it is not enough to determine a student’s level of performance. In fact, our Novice Low-Mid students might be the most comprehensible of all! Because they rely exclusively on memoried words and phrases, these students can often produce error-free lists or other appropriate novice tasks. Therein lies the importance of the second bold print sentence, which specifies the text type, amount of detail and organizational features of the student’s performance. When using this rubric, the student’s level is determined by the highest level for which the student meets all of the criteria.
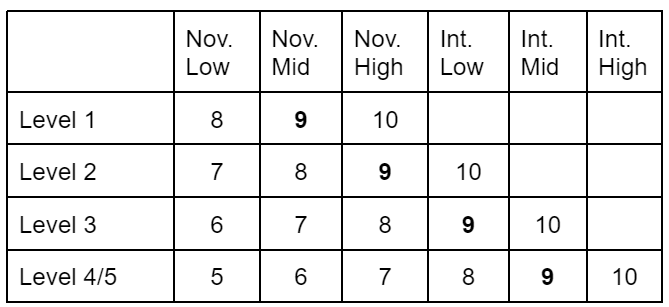
Most of us will have one more challenge, which is to assign a letter or percentage grade to the performance. Doing so may depend on your school culture, personal philosophy and other factors. Personally, I feel most comfortable assigning a 9/10 (or 90%) to students who meet the targeted proficiency level. For standards-based grading, I would use this level as the Level 3 or “Meets the standard.” The next highest level would be assigned a 10/10 or Level 4 “Exceeds the standard.” I would assign a score of 8/10 for the proficiency level that is one below the target, a 7/10 to the level that is two below the target, and so on. Here’s a table that reflects this scoring method.
I’d love to hear how you’ve addressed the challenges in using rubrics to assess written tasks. Please share by clicking on “Leave a reply” at the top of this post!